Showing posts with label Technique Tuesday. Show all posts

Tuesday, February 5, 2013

Technique Tuesday

It's been a while since I posted a technique so how 'bout I share a couple of cards I made using the *hot right now* Chalkboard Technique.  This is one of those *stinking quick, cute and easy* techniques, that I couldn't pass it up!


Perfect for Valentines Day!


Had to do a throwback of the green chalkboard.  This one was fun!  Just rummaged through all my cling stamps and made a collage of birthday themed stamps on a large acrylic block, ink it with Versamark, and heat emboss with white embossing powder.  Then, with a sponge or washcloth, pick up white ink right from the pad and smear it around.  It's best to layer by adding a little at a time, here and there to give it that used chalkboard look.  Have fun!

Thanks for stopping by!

Tuesday, November 27, 2012

Technique Tuesday

Are you ready for another fun technique?  Have you heard of *Ghosting*?  Well, I saw this technique on Pinterest and just had to give it a try!  You can view the how-to video HERE .   Now, there might be another name for this technique but I liked it so I didn't search any further. :o)


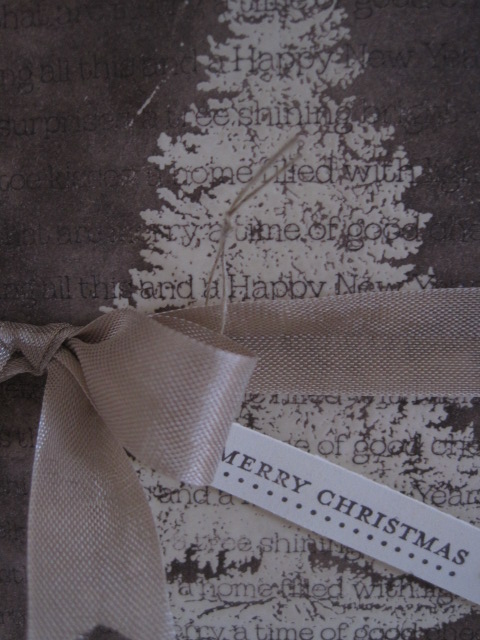
The how-to video shows you this technique using background paper but I wanted to show another way, too. So, I came up with the beautiful tree card, using stamps instead.


For the Merry Christmas card I stamped a Christmas saying all the way down the Very Vanilla card stock for the background.  Then, I stamped the tree, from the Christmas Lodge stamp set, in Versamark and heat embossed with Clear Embossing Powder.  Then, I sponged in a swirling motion, Chocolate Chip ink over the whole thing, including the tree.  When you do that, it gets in the nook and crannies and gives it all of that wonderful detail.  The more ink you sponge/swirl on, the darker it gets and covers up the background words that were stamped. 

I glued that layer onto a layer of Chocolate Chip card stock then added the bow.  Then, added Dimensionals to that layer and placed it on a Crumb Cake card base.  I stamped the Merry Christmas from Teeny Tiny Wishes stamp set in Chocolate Chip ink on a strip of Very Vanilla card stock.  Poked a teeny tiny hole :o) with the paper piercer and ran linen thread through it and tied it to the bow.  I just had to add some bling with some pearls!


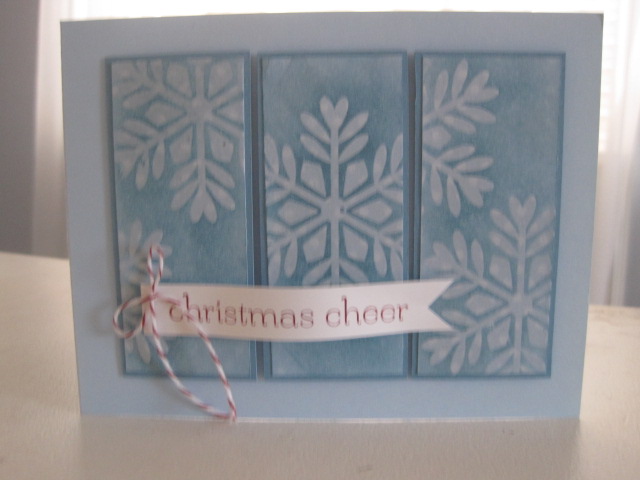
For the Christmas Cheer card I started with 3 pieces of Bashful Blue Designer Series Paper with the polka dots cut at 1 3/8" x 3 1/4".  I stamped the new single Bold Snowflake randomly in Versamark on the designer paper then again, heat embossed in clear embossing powder.  FYI:  when you're stamping, it's hard to see where you've already stamped, so if you have a good memory, great!  If you're like me, you might have to keep checking so you're not stamping in the same places.

Then, I sponged Marina Mist ink in a swirling motion, again all over the paper and snowflake images.  Then, I glued them on to Marina Mist strips and popped them up on Dimensionals and placed them on a Bashful Blue card base.  I added the sentiment from the Sweet Essentials stamp set in Cherry Cobbler ink and added a twine bow.

Now, I hope you have fun with this technique!  I look forward to using it again in the near future!

Thanks for stopping by!

Thursday, October 25, 2012

Aluminum Foil Technique

As I was looking for a technique for my Technique Tuesday class, I saw many cards made with metal.  I loved the look but didn't have any metal sheets but I did have heavy duty aluminum foil which I thought would make a great substitute!  Of course it isn't as stiff as metal so you'll need to be careful with it but the look is right on!


For this card, I ran a piece of heavy duty aluminum foil through the Big Shot with the "Top Note" Die then ran it through again in the Vintage Wallpaper folder.  Then, with a sponge, I swirled Basic Black ink over the foil.  The more ink, the darker which gives it a great worn or patina look.  Then, I added a flower I made with the Rich Razzleberry paper, bow from the Basic Black Taffeta Ribbon and a sentiment from the Sweet Essentials stamp set.


This one was even easier!  I distressed the edges of Baja Breeze and Whisper White card stock and layered them.  Then, I cut a snowflake from the Snowflake #2 Sizzix die (retired).  Then, tied some twine and made a bow so that when you are putting it in an envelope, it runs along the twine and not the foil.  I added a sentiment from the Teeny Tiny Wishes stamp set.  This set has a sentiment for practically every occasion you can think of!

(Forgot to mention that I just glued the foil to the card stock on both cards with the Tombow Multipurpose Liquid Glue, LOVE IT!!!)

Have fun with this technique!  Would love to see what you come up with!

Thanks for stopping by!

Thursday, September 27, 2012

Merry Time

At the last Technique Tuesday class, we learned how to use the Stamp-a-ma-jig.  I had to dig it out and dust it off because I NEVER use it.  I'm fine when my stuff doesn't line up, in fact I do it on purpose just to get the point across but there are others out there that prefer to have their letters, images, etc... line up.  So, I thought it would be fun to show them that they don't have to *Try* to line everything up, and maybe mess up and have to start over, they can actually do it the first time and be on their way.

Well, in the years that my lonely Stamp-a-ma-jig wasn't being used, the plastic sheet has been misplaced so I used vellum card stock instead.   If you are using wood stamp sets, this is better anyway, in my opinion.  Because you can just slip the vellum in with the stamp set when you're done and re-use it the next time you use the set.  Brilliant!

For this card, we lined up the letters of the word Merry using the Stamp-a-ma-jig. 


You might have noticed that Banners are all the rage right now so I thought they would be perfect for a Christmas card! I also jazzed up the white background with the Chevron Folder and the Big Shot.  Added some twine and pearls and wha-la, a Cheery Holiday card!

Just wanted to give you a couple tips for the Halloween Cello Bag Treat I posted the other day.  Yes, it's possible to stamp on plastic!  All you have to do is use Stazon ink!  It stamps on almost anything! What a wonderful invention!  Be sure to give it a try!


It is a little slippery on slick surfaces but just take care when you are pressing down on the stamp.  And, give it a minute to dry.


To attach ribbon to the top of the cello bag, you can tie the ribbon around it, punch a hole and run the ribbon through but I've found it's quick and cute to just staple it!  You can even use the color staples to add a little more bling.

Thanks for stopping by!

Thursday, July 26, 2012

Poppin' Pastels, Baby


Wanna learn this fun technique?  Are your pastels/chalks buried underneath a pile of other crafting stuff?  Well, today you will want to dig them out and play!  All you need is Versamark, pastels/chalks and of course, a rubber stamp!

Here are the cards we created in the last Technique Tuesday class using this awesome technique.


For this card, I stamped the frame, from the *Papaya Collage* stamp set, in Versamark on Very Vanilla cardstock.  Let it dry for about 5 minutes (you can start assembling other parts of the card while you are waiting).  Then, I used a cotton ball and used it to *color* with the Early Espresso chalk.  Just swirl the cotton ball on the chalk then swirl it on your stamped image.  The more times you do that, the darker it will get.  I swirled it because I wanted to give it a soft but distressed look.  You might be able to see in the pics that I swirled the chalk inside the frame and on the outside, too.


For this card, you will notice the colors are more intense.  To create this look, I again stamped my image all over the Whisper White layer with Versamark.  The flower I used is from the *Papaya Collage* stamp set, too.  (Can you tell I love this set? :o)  You might have to tip your paper so the light can shine on it, to see where you have stamped already, then, just fill in the empty spaces.  Again, let it dry for about 5 minutes.  This time I used a Qtip and used smaller swirl motions.  Then, to fill in the white space in between the flowers, I used a cotton ball swirled in the same *Tangerine Tango* chalk that I used for the flowers and swirled it where ever I wanted the soft color added.

Hope you have fun with this technique!  Let me know if you have any questions!

Thanks for stopping by!

Friday, May 25, 2012

Goin', Goin', Going!

Boy, have we been a little busy around here! It feels like we have been goin', goin', going!

Keara's last day of 7th grade was last Thursday and Shaylin's last day of 3rd grade was this past Wednesday.  In that time, Keara has attended 2 birthday parties, Shaylin had an ALL day fieldtrip to Tucson, AZ on Monday then the 3rd grade classes at her school had a Mad Science Day on Tuesday and I had my Technique Tuesday Class that night!  I'm in exhale mode now.


Shaylin and I at the cave near Tucson, AZ.  Wish we could have taken pictures inside the caves!


Getting ready to go down in the copper mine in Bisbee, AZ.


Shaylin and I on the bus back to school at the end of a fun and long day.  What a Great time we had!


This Techique Tuesday class was Pop-up cards, again.  They were a different type of pop-up card than the ones we learned in the last class.  I would call them Pop-Out cards.


This is the inside of the each of the 2 cards we made.  I will share the WWYD (What Would You Do) cards and guts for the next one, in the next few days.  So, look for that!

I also wanted to say a big *Thank You* to Michelle for bringing a cake to Celebrate my 100th Meetup!  (www.meetup.com/inkie-pinkies)  I didn't even notice but she did and it was so nice! 


Thanks again, Michelle!

Don't forget, the Stampin' Up! retiring items are Goin', Goin', Going!  You only have 'til May 31st to get them before they are gone!  You can order 24/7:  HERE

Have a fun and safe Memorial Weekend!  Thanks for stopping by!

Wednesday, March 28, 2012

Wanna Play?


Last night was my Technique Tuesday class and we learned the *Tap Dancing* technique.  But, before I get to the projects we made, I wanted to share another fun part of this class.  It's called *WWYD* ~ What Would You Do?  Everyone gets an envelope of the same supplies to take home with them.  Then, at the next Technique Tuesday class, everyone brings the card they made with the supplies.  It is so fun to see what everyone created and no 2 cards are ever the same. 

SOOO, I thought I would see if you wanted to join in the fun, too?!  Here are the supplies that everyone got at class last night.  Just copy the supplies below and see what you can create.  Feel free to share what you made by emailing me a pic and I will post it here after my next Technique Tuesday Class, along with what everyone at class created.  Wanna play?

(If you'd like to check out our WWYD cards from last night, go to my meetup site:  www.meetup.com/inkie-pinkies)


WWYD Supplies:  8 1/2" x 5 1/2" Tempting Turquoise cardstock, 4 1/4" x 2" Brights Collection Paper Stack, 1 1/2" x 5 1/2" Whisper White cardstock, 2 Whisper White Blossom Punch, 1 1/4" Pumpkin Pie circle punch, 1" Whisper White Circle Punch stamped with Pumpkin Pie Mixed Bunch stamp.

This is the 1st time trying this on my blog so if you have any suggestions or questions, they are always welcome!

Ok, on to the *Tap Dancing* technique we learned last night.  I found this technique in the Stampin' Success for April.  As a Stampin' Up! Demonstrator, we receive this magazine monthly.  It's a great source for ideas and motivation.  Feel free to contact me if you'd like to know more!


This is the card we made in class.


This is the note card/envelope we made using the Scallop Envelope Bigz Die.

Tap Dancing How To:  Choose a stamp and a lighter color ink pad and a darker color marker.  You can use more than 2 colors but I just used 2 on each project.  You will ink up your stamp with the lighter ink pad then randomly color over the inked stamp with a darker color marker.  Just try it once and you will see how easy it is.  And, each time you do it, it will never come out the same twice.

 Have fun with this technique!  Contact me if you'd like a list of supplies.

Thanks for stopping by!

Related Posts Plugin for WordPress, Blogger...