Showing posts with label Sweet Essentials stamp set. Show all posts

Tuesday, November 27, 2012

Technique Tuesday

Are you ready for another fun technique?  Have you heard of *Ghosting*?  Well, I saw this technique on Pinterest and just had to give it a try!  You can view the how-to video HERE .   Now, there might be another name for this technique but I liked it so I didn't search any further. :o)


The how-to video shows you this technique using background paper but I wanted to show another way, too. So, I came up with the beautiful tree card, using stamps instead.

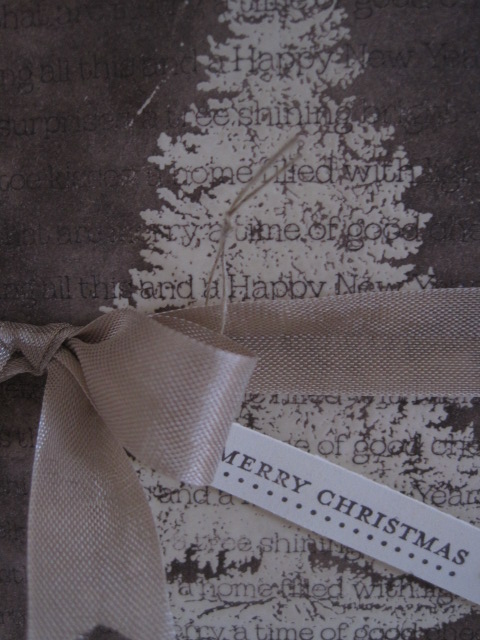


For the Merry Christmas card I stamped a Christmas saying all the way down the Very Vanilla card stock for the background.  Then, I stamped the tree, from the Christmas Lodge stamp set, in Versamark and heat embossed with Clear Embossing Powder.  Then, I sponged in a swirling motion, Chocolate Chip ink over the whole thing, including the tree.  When you do that, it gets in the nook and crannies and gives it all of that wonderful detail.  The more ink you sponge/swirl on, the darker it gets and covers up the background words that were stamped. 

I glued that layer onto a layer of Chocolate Chip card stock then added the bow.  Then, added Dimensionals to that layer and placed it on a Crumb Cake card base.  I stamped the Merry Christmas from Teeny Tiny Wishes stamp set in Chocolate Chip ink on a strip of Very Vanilla card stock.  Poked a teeny tiny hole :o) with the paper piercer and ran linen thread through it and tied it to the bow.  I just had to add some bling with some pearls!
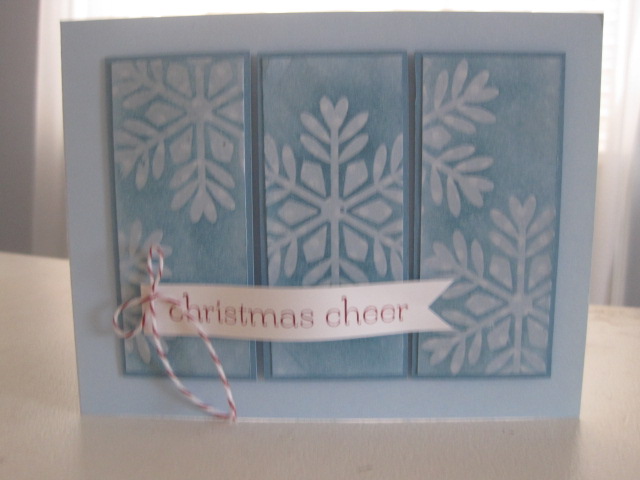


For the Christmas Cheer card I started with 3 pieces of Bashful Blue Designer Series Paper with the polka dots cut at 1 3/8" x 3 1/4".  I stamped the new single Bold Snowflake randomly in Versamark on the designer paper then again, heat embossed in clear embossing powder.  FYI:  when you're stamping, it's hard to see where you've already stamped, so if you have a good memory, great!  If you're like me, you might have to keep checking so you're not stamping in the same places.

Then, I sponged Marina Mist ink in a swirling motion, again all over the paper and snowflake images.  Then, I glued them on to Marina Mist strips and popped them up on Dimensionals and placed them on a Bashful Blue card base.  I added the sentiment from the Sweet Essentials stamp set in Cherry Cobbler ink and added a twine bow.

Now, I hope you have fun with this technique!  I look forward to using it again in the near future!

Thanks for stopping by!

Monday, November 26, 2012

Simply Snowflakes

I love how you can take a simple snowflake and turn it into a beautiful wreath!  Now, this isn't a Stampin' Up! punch (shh... its Martha Stewart) but it will have to do. :o)


Wow, I didn't realize this last pic was blurry.  Hope it's not messing with you too much.

I punched the snowflakes from Baja Breeze, Crumb Cake, Whisper White and Silver Glimmer Paper from Stampin' Up!  Then, I arranged them in a circle and glued them down as I went, then, added a bow made from Crumb Cake Taffeta Ribbon.  The background is Crumb Cake with a layer of it run thru the Big Shot and the Woodgrain Embossing Folder.  Added the sentiment from the Sweet Essentials stamp set in Baja Breeze ink but you could stamp it in Marina Mist instead and ba da bing, it's done!

Thanks for stopping by!

Thursday, September 20, 2012

Christmas Cheer

This first card I received from my upline, Diana Gibbs.  So sweet & simple, LOVE it!


Thanks Diana!  :o)

As you might know, it's never too early to start making your Holiday cards!  For this card, I wanted to make my favorite new accessory in the Stampin' Up! Holiday Catalog ~ the Scalloped Tulle Ribbon on page 4, the star of the show.  It's so versatile, easy to work with and beautiful, you'll want all 3 colors available! 

All you have to do is make a bow around your top layer and accessorize!  Just be sure to add dimensionals to that layer to accommodate the ribbon in the back.  This layout can be used for any occasion!


This card is so easy you can create enough, for your whole Holiday Card List, in no time at all!

Stampin' Supply List:
  • Stamp Set:  Sweet Essentials  cling #126457, wood #126455
  • Paper:  Cherry Cobbler  #119685, Very Vanilla #101650
  • Ink:  Cherry Cobbler #126966
  • Accessories:  Big Shot  #113439, Top Note Bigz Die #113463, Vintage Wallpaper Folder #120175, Cherry Cobbler 3 1/2" Scalloped Tulle Ribbon #127841, Brushed Bronze Designer Buttons #127833, Vintage Trinkets  #118764, Dimensionals #104430, Cream Twine
Thanks for stopping by!

Monday, July 9, 2012

Craft Kit Monday

Today's kit is for the *Cute Containers Kit*.  This kit includes all the supplies needed to make 4 cute containers!  You can purchase this kit for only $16.00 and that includes supplies, shipping and fees.  Any additional kits are only $13.00 each.


The 4 Cute Containers!


Small gift bag/favor bag using the Fancy Favor die.


Small Sewing/Picnic Basket


Cute container using 2 Scallop Envelope dies.


Watering Can made with new Petite Purse Bigz L die.

To purchase the Cute Containers Kit, please email me at: inkadink4@aol.com and include your name, mailing address and email address. Please let me know how you would like to pay, I accept cash, check or Paypal. If you choose to pay by cash or check, I will give you my mailing address. If you choose to pay by Paypal, I will send you an invoice. Once I receive your payment, I will mail your Kit.

Your Cute Containers Kit will be carefully packed with cardboard to help prevent it from being bent and will include the supplies to make all 4 cute containers, with detailed instructions to recreate each one. You will need sticky strip, dimensionals (pop dots) and glue. If you would like to distress the edges, you will need a light brown ink (I used Crumb Cake) to sponge the edges of the sewing/picnic basket and grey or black (I used Basic Grey) for the watering can.

When you receive your kit, you will notice that I have stamped on the back of all of the stamped images to comply with Stampin' Up!'s Angel Policy. This stamped image will not affect your completed projects.

Please let me know if you have any questions.

Thanks for stopping by!

Friday, June 29, 2012

Dryer Sheet Technique

A day late but here are the cards we made at this weeks Technique Tuesday class.  The dryer sheet is a fun technique and who knew you could make something so cute out of something you would normally throw away!?!


Dryer Sheet Technique:  cut your desired shape out of a dryer sheet.  To color the dryer sheet, I filled one of Stampin' Up!'s new Stampin' Spritzer almost to the top with water then added 13 drops of Melon Mambo ink refill for the watermelon and Pumpkin Pie ink refill for the flower.  Then, I placed the dryer sheet shapes on wax paper and spritzed them until they were covered.  Then, I blotted them in paper towels and let them sit until they were dry.

Let me know if you have any questions.

Thanks for stopping by! 

Related Posts Plugin for WordPress, Blogger...