Showing posts with label Mixed Bunch. Show all posts

Monday, February 11, 2013

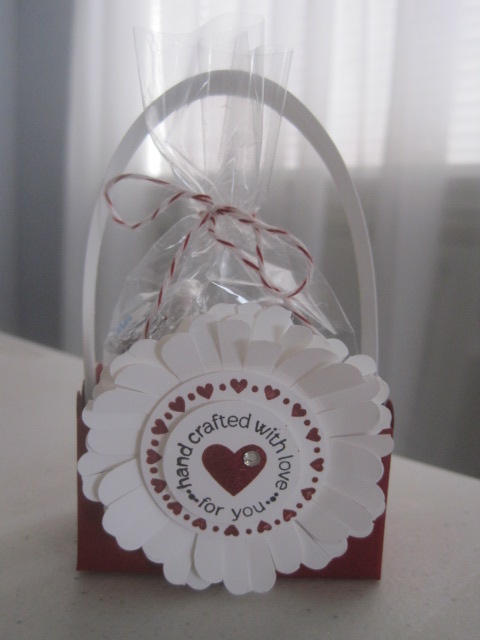
Valentine Treat Box

Just a quick post today!   I found this cute treat box on Pinterest.  It was made using the Scallop Square die and the flower is made with the Mixed Bunch punch.


Hope you can view the video on how to make this sweet box: Youtube Video

Thanks for stopping by!

Tuesday, October 16, 2012

September Thank You Cards

 Just sharing the *Thank You* cards I sent out to my customers that placed online orders through my website in September.


Want to get a complimentary card from me?  Just place an order though my online store HERE and you will receive your card in the mail at the beginning of the following month.

I also wanted to share another quick and gross treat that anyone would love to make and eat! 

 
Dirty Q-tips!
 
Attach small marshmallows to the end of toothpicks and dip in melted caramel or butterscotch chips.  Yuck and Yum!  Have Fun!
 
Thanks for stopping by!

Monday, July 2, 2012

Craft Kit Monday

First off, I want to *Thank* everyone that has taken time to stop by and view my blog!  I hope that you have found inspiration in one, some or all, of the posts you have viewed. 

I know there are many blogs that I visit that have projects that I would love to recreate but either do not have the stamps, inks, paper, etc... or have no idea how to make it. 

Soooo, that got me thinking, maybe some of you might be dealing with the same issue.  And, that's when I came up with the idea of offering kits that you can purchase to recreate items or projects you see on my blog.

My first Craft Kit is for the *Vintage Mixed Bunch Card*.  I chose this card because it is one of the most viewed posts on my blog.  The kit for this card is only $4.50 and that includes shipping and fees.  If you'd like to make more than 1, any additional kits are only $3.50 each.


To purchase a kit for this card, please email me at:  inkadink4@aol.com and include your name, mailing address and email address.  Please let me know how you would like to pay, I accept cash, check or Paypal.  If you choose to pay by cash or check, I will give you my mailing address.  If you choose to pay by Paypal, I will send you an invoice.  Once I receive your payment, I will mail your Craft Kit.


Your Craft Kit will be carefully packed with cardboard to help prevent it from being bent and will include the supplies shown in the picture above with detailed instructions to recreate this beautiful card.  You will need dimensionals (pop dots) and glue.  If you would like to distress the edges, you will need a light brown ink (I used Crumb Cake) to sponge the edges of the card stock and lace ribbon punched pieces.

When you receive your kit, you will notice that I have stamped on the back of all of the stamped images to comply with Stampin' Up!'s Angel Policy.  This stamped image will not affect your completed card.

Please let me know if you have any questions.

Thanks for stopping by!

Tuesday, June 5, 2012

Thank You cards for May orders

So much going on around here but I just wanted to quickly share the complimentary cards I am sending out for orders placed in May.


These cards are so quick and easy to make using the Fun Flowers Bigz Die and the Big Shot.  Then I placed the flower parts into the Perfect Polka Dot folder and ran it thru the Big Shot just to add a little more dimension to the flower.  Glue the flower together then add to card base. Super simple, just the way I like!

Thanks for stopping by!


Thursday, May 10, 2012

Teacher Appreciation Week ~ Gift #4

Today's teacher gift is a pop-up card I made using the *Mixed Bunch* stamp set.  I got the idea from Dawn Griffith's blog and you can check out her video for measurements and directions HERE.

Of course, I had to change it a *little* to make it more my style.


The flowers were created using the *Rock & Roll* technique.  I inked the flower in a lighter ink then roll the edges around in a darker ink color.  I used Pretty in Pink for the lighter color and Rich Razzleberry for the darker color.  Then, I used the Rich Razzleberry marker to color in the center of the flower.  Be sure to *huff* the stamp before you stamp the image.  For the center of the flower, I used the 2-way glue pen and Dazzling Diamond Glitter.  Perfect!

Important tip:  when doing this technique, make sure you clean your stamp if you are stamping the image more than once.  Otherwise, you will mess up your lighter ink pad. 


Enjoy and don't forget to spoil a Teacher!

Wednesday, April 18, 2012

Envie Basket

I had my *Envie Class* last night and it was so much fun!  There are so many beautiful things you can create with a simple envelope, who knew!?!  Over the next few days, I will share some of the different projects we made.

Today, I am sharing the *Envie Basket*.  We made this project with Stampin' Up!'s Crumb Cake envelope #107297.  The feel/look of this was inspired by a card made by Becky @ Inking Idaho.  You can view her card here:  http://inkingidaho.blogspot.com/2012/04/crumb-cake-embossingsounds-yummy.html


Wondering how to make this?  Here we go!

  
You will seal the envelope closed then punch either side with the Large Tag Punch #119876.


Then, you will cut up, on both sides, following the punched part to create the *handle*.  You will notice I crimped the *handle* with the Crimper #101618 and the *basket* was run through the Big Shot #113439 with the Vintage Wallpaper Folder #120175.  From there you can decorate it any way you'd like!  You can also use any size envelope you want.

Here's how to make the flower.  Not sure if it's the same way Becky made hers but this is what I did.


I punched  2 ~ 1 3/4" Scallop Punch #119854 (I stacked them & cut @ each indent almost to the center to make *petals*) and 1 Blossom Punch #125603 in Pool Party cardstock.  The leaves are from the Blossom Punch also in Lucky Limeade.  The center of the flower is from the Mixed Bunch stamp set w #125535 c #125537 with a Basic Rhinestone #119246 in the center.


Then, you will scrunch up all of the pieces except for the center.


Open them up and glue together with Multipurpose Liquid Glue #110755. 

I placed an Oatmeal Pie inside the basket because that's what I had on hand but you can fill it with whatever you want.  Have Fun!

Thanks for stopping by!  Enjoy!

Wednesday, March 28, 2012

Wanna Play?


Last night was my Technique Tuesday class and we learned the *Tap Dancing* technique.  But, before I get to the projects we made, I wanted to share another fun part of this class.  It's called *WWYD* ~ What Would You Do?  Everyone gets an envelope of the same supplies to take home with them.  Then, at the next Technique Tuesday class, everyone brings the card they made with the supplies.  It is so fun to see what everyone created and no 2 cards are ever the same. 

SOOO, I thought I would see if you wanted to join in the fun, too?!  Here are the supplies that everyone got at class last night.  Just copy the supplies below and see what you can create.  Feel free to share what you made by emailing me a pic and I will post it here after my next Technique Tuesday Class, along with what everyone at class created.  Wanna play?

(If you'd like to check out our WWYD cards from last night, go to my meetup site:  www.meetup.com/inkie-pinkies)


WWYD Supplies:  8 1/2" x 5 1/2" Tempting Turquoise cardstock, 4 1/4" x 2" Brights Collection Paper Stack, 1 1/2" x 5 1/2" Whisper White cardstock, 2 Whisper White Blossom Punch, 1 1/4" Pumpkin Pie circle punch, 1" Whisper White Circle Punch stamped with Pumpkin Pie Mixed Bunch stamp.

This is the 1st time trying this on my blog so if you have any suggestions or questions, they are always welcome!

Ok, on to the *Tap Dancing* technique we learned last night.  I found this technique in the Stampin' Success for April.  As a Stampin' Up! Demonstrator, we receive this magazine monthly.  It's a great source for ideas and motivation.  Feel free to contact me if you'd like to know more!


This is the card we made in class.


This is the note card/envelope we made using the Scallop Envelope Bigz Die.

Tap Dancing How To:  Choose a stamp and a lighter color ink pad and a darker color marker.  You can use more than 2 colors but I just used 2 on each project.  You will ink up your stamp with the lighter ink pad then randomly color over the inked stamp with a darker color marker.  Just try it once and you will see how easy it is.  And, each time you do it, it will never come out the same twice.

 Have fun with this technique!  Contact me if you'd like a list of supplies.

Thanks for stopping by!

Sunday, March 25, 2012

Sale-a-bration Time is almost over!

Just a quick reminder that there is only 1 week left to earn FREE Sale-a-bration items! All you need to do is place a $50 Stampin' Up! order (before shipping and tax) and you will qualify!  You can view the Sale-a-bration catalog on my Stampin' Up! website under *Products*.
 
If you place an online order thru my website (www.jillparker.stampinup.net), this week, I will send you a kit for one of my *Easel Boxes*, as a *Thank You*!   Don't miss out on your opportunity to receive one of these cuties!


Remember, you only have until March 31st to place your Sale-a-bration order!


Keara and Shaylin went to a Birthday Slumber Party last night so I had the night to myself. Did I watch a movie, get in the hot tub, craft, etc...? I was asleep by 9:30pm, how sad is that?!  Maybe I'll get some stuff done today.  :o)
 
Here is the tag I made for the gift bag.  I punched the 2 1/2" circle in black and white and glued them together so the girls could sign their birthday wishes on the white side.
 
Stampin' Supplies List:
  • Stamps:  Mixed Bunch  wood #125535  clear #125537
  • Ink:  Melon Mambo #115656
  • Paper:  Whisper White #100730, Basic Black #121045,
  • Accessories:  Blossom Punch #125603, 2 1/2" Circle Punch #120906, 1/2" Circle Punch #119869, Crimper #101618, Glitter Chipboard letter, black bakers twine
Have a Wonderful Day!

Thursday, March 22, 2012

Vintage Mixed Bunch Card

Added 7/2/12:  Would you like a kit for this card?  Click HERE for details.

Just wanted to share another project we will be making in tonight's *Mixed Bunch* class.  Love, love, love these soft colors together!  How 'bout you?


Want to make one?  Contact me to find out how!

Stampin' Supplies List:
  • Stamp: Mixed Bunch wood #125535 clear #125537, You're My Type  wood #125564  clear #125650
  • Ink:  Baja Breeze #111833, Crumb Cake #121030
  • Paper:  Very Vanilla #101650
  • Accessories: Blossom Punch #125603, Lace Ribbon Border Punch #122362, 3/4" Circle Punch #119873, Jewelry Tag Punch #117190, Very Vanilla Seam Binding Ribbon #120999, Linen Thread #104199, Basic Pearl Jewels #119247, Large Pearl Basic Jewels #125577, Dimensionals #104430

Thanks for stopping by!


Wednesday, March 21, 2012

Simply Wonderful!

Hi!  I'm a box full of Sweet & Korny Carmel Corn and I'm all packed up and ready for my trip to Fort Bragg, CA!  Yippee!  I can't wait to get there! 


If you'd like a box full of *Melt in your mouth* Carmel Corn shipped to you or someone special, email me or make a comment and I'll contact you ASAP so I can get your order made and on it's way.  If you'd like more info (sizes & prices) check out my Sweet & Korny post or I can let you know when I contact you. 


This cute * Blossom Easel Box* is one of the projects we will be making in my *Mixed Bunch Class* tomorrow night!  I was inspired by Diana Gibbs easel box, which you can view here:  http://dianagibbs.typepad.com/stampin_with_di/2010/03/easter-easel-box-tutorial.html

There are quite a few steps but the result is worth it!  It is simply wonderful!

Stampin' Supplies List:
  • Stamp:  Mixed Bunch  wood #125535  clear #125537, Friendly Phrases  wood #126149  clear #126151
  • Ink:  Old Olive #102277
  • Paper:  Daffodil Delight #119683, Whisper White #100730, Brights Designer Series Stack #117155
  • Accessories: Blossom Punch #125603, 5-Petal Flower Punch #119880, 3/4" Circle Punch  #119873, Crimper #101618, Subtles Brads #119740, Paper Piercing Tool #116631, Mat Pack #105826, Dimensionals #104430
Thanks for stopping by!  I'm off to bed, Goodnight!

Related Posts Plugin for WordPress, Blogger...