Showing posts with label Pennant Parade stamp set. Show all posts

Thursday, July 26, 2012

Poppin' Pastels, Baby


Wanna learn this fun technique?  Are your pastels/chalks buried underneath a pile of other crafting stuff?  Well, today you will want to dig them out and play!  All you need is Versamark, pastels/chalks and of course, a rubber stamp!

Here are the cards we created in the last Technique Tuesday class using this awesome technique.


For this card, I stamped the frame, from the *Papaya Collage* stamp set, in Versamark on Very Vanilla cardstock.  Let it dry for about 5 minutes (you can start assembling other parts of the card while you are waiting).  Then, I used a cotton ball and used it to *color* with the Early Espresso chalk.  Just swirl the cotton ball on the chalk then swirl it on your stamped image.  The more times you do that, the darker it will get.  I swirled it because I wanted to give it a soft but distressed look.  You might be able to see in the pics that I swirled the chalk inside the frame and on the outside, too.


For this card, you will notice the colors are more intense.  To create this look, I again stamped my image all over the Whisper White layer with Versamark.  The flower I used is from the *Papaya Collage* stamp set, too.  (Can you tell I love this set? :o)  You might have to tip your paper so the light can shine on it, to see where you have stamped already, then, just fill in the empty spaces.  Again, let it dry for about 5 minutes.  This time I used a Qtip and used smaller swirl motions.  Then, to fill in the white space in between the flowers, I used a cotton ball swirled in the same *Tangerine Tango* chalk that I used for the flowers and swirled it where ever I wanted the soft color added.

Hope you have fun with this technique!  Let me know if you have any questions!

Thanks for stopping by!

Wednesday, May 30, 2012

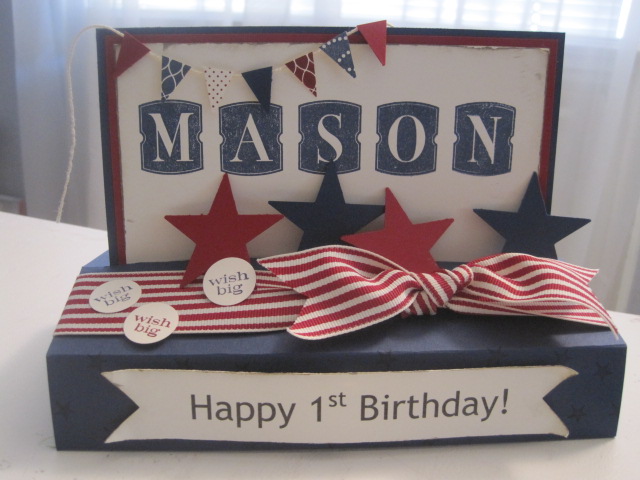
Mason's Birthday Card

My nephew's sweet baby Mason turned ONE last week and I just had to make him a special card to celebrate his 1st Birthday!  It's like the pop-up card from my blog post on 5/10/12.  Of course, I changed it some so I could fit his name and it ended up fitting in an envelope for an 5 1/2" x 8 1/2" card.


As you can see, I included some extra goodies (banner, star punches, etc) so his mommie, Brittney, can decorate it, if she decides to.

Thanks for stopping by!

Friday, May 25, 2012

Goin', Goin', Going!

Boy, have we been a little busy around here! It feels like we have been goin', goin', going!

Keara's last day of 7th grade was last Thursday and Shaylin's last day of 3rd grade was this past Wednesday.  In that time, Keara has attended 2 birthday parties, Shaylin had an ALL day fieldtrip to Tucson, AZ on Monday then the 3rd grade classes at her school had a Mad Science Day on Tuesday and I had my Technique Tuesday Class that night!  I'm in exhale mode now.


Shaylin and I at the cave near Tucson, AZ.  Wish we could have taken pictures inside the caves!


Getting ready to go down in the copper mine in Bisbee, AZ.


Shaylin and I on the bus back to school at the end of a fun and long day.  What a Great time we had!


This Techique Tuesday class was Pop-up cards, again.  They were a different type of pop-up card than the ones we learned in the last class.  I would call them Pop-Out cards.


This is the inside of the each of the 2 cards we made.  I will share the WWYD (What Would You Do) cards and guts for the next one, in the next few days.  So, look for that!

I also wanted to say a big *Thank You* to Michelle for bringing a cake to Celebrate my 100th Meetup!  (www.meetup.com/inkie-pinkies)  I didn't even notice but she did and it was so nice! 


Thanks again, Michelle!

Don't forget, the Stampin' Up! retiring items are Goin', Goin', Going!  You only have 'til May 31st to get them before they are gone!  You can order 24/7:  HERE

Have a fun and safe Memorial Weekend!  Thanks for stopping by!

Thursday, May 3, 2012

Pop Up Banner Card

Wanted to start off by saying *good-bye* to our little fish.  We are so sad that he was unable to over come his injuries.  I know he was just a goldfish but he's been a part of our family for so long and now his friend is all alone in the fish tank they shared. RIP

Now on to brighter things.  The following is a *Pop Up* card we made in my Technique Tuesday class last week.  I was inspired by this card created by Tina White:  http://www.splitcoaststampers.com/gallery/photo/2040269?&cat=21496


Stampin' Supplies List:

  • Stamp:  Pennant Parade  wood #122740 clear #122742, Create a Cupcake  wood #121915  clear #121982
  • Ink:  Perfect Plum  #101437, Elegant Eggplant  #105210
  • Paper:  Perfect Plum #101889, Elegant Eggplant #105126, Whisper White #100730
  • Accessories: Petite Pennants Builder Punch #122361, Boho Blossoms Punch #119858, Large Oval Punch #119855, Scallop Oval Punch #119856, 3/8" Whisper White Taffeta Ribbon #109070, Basic Pearls #119247
Thanks for stopping by!

Thursday, April 19, 2012

Envie Pocket Card

Are you ready for another cute project you can make with a plain envelope?  Then, be sure to try this easy pocket card!


I used a 5 3/4" x 4 3/8" envelope, sealed it then trimmed 1/8" off the end.   I punched that same end with half of a circle punch so the layered piece of cardstock could easily be pulled out.   I crimped the envelope to make it smaller so that it would fit inside the same size envelope.


Then, decorate anyway you'd like.  Have fun!

Thanks for stopping by! 
Related Posts Plugin for WordPress, Blogger...