Showing posts with label Big Shot Die-Cutting Machine. Show all posts

Friday, December 14, 2012

*Believe*

I'm so excited to share this banner we made in my *Christmas Craft Class*!  It's the perfect addition to your home decor for this Holiday season!


You might be able to tell that I wouldn't have been able to make this banner without my wonderful Big Shot!  I used the Top Note Die embossed in the Square Lattice folder, a snowflake and alphabet die that are now retired.  But, you can use the current of each one and it would be just as beautiful!  The card stock colors used were Sahara Sand, Whisper White and Cherry Cobbler.

Hope you get a chance to make this beauty!  Give me a holler if you have questions.

Thanks for stopping by and Happy Holidays!
Monday, November 26, 2012

Simply Snowflakes

I love how you can take a simple snowflake and turn it into a beautiful wreath!  Now, this isn't a Stampin' Up! punch (shh... its Martha Stewart) but it will have to do. :o)


Wow, I didn't realize this last pic was blurry.  Hope it's not messing with you too much.

I punched the snowflakes from Baja Breeze, Crumb Cake, Whisper White and Silver Glimmer Paper from Stampin' Up!  Then, I arranged them in a circle and glued them down as I went, then, added a bow made from Crumb Cake Taffeta Ribbon.  The background is Crumb Cake with a layer of it run thru the Big Shot and the Woodgrain Embossing Folder.  Added the sentiment from the Sweet Essentials stamp set in Baja Breeze ink but you could stamp it in Marina Mist instead and ba da bing, it's done!

Thanks for stopping by!

Wednesday, November 21, 2012

Fall, here at last!

Oh, am I enjoying the Fall weather here in Arizona!  I've been waiting for it all summer and it's finally here!  Can you beat 76 degrees at the end of November?  Hope you are enjoying your weather where ever you are!


Just a quick little toot for creating a burlap affect with card stock.
 
First I cut out my banner with the Top Note Die and the Big Shot with Crumb Cake card stock.  Then, I glued the letters on and ran it through the Big Shot again, in the Square Lattice Embossing Folder and ta-da, you get the look above.
 
To embellish, I punched flowers from the Boho Blossoms punch and Cajun Craze card stock.  The leaves are from the Bird punch and Lucky Limeade card stock.  Add a pearl to each flower for some bling.  Then, I punched holes in the corners and ran twine through to hang it.  Enjoy!
 
Thanks for stopping by!
 

Friday, October 5, 2012

Freaky Friday Week #7


This weeks' Halloween Treat Holder was inspired by a project you can find on my website HERE  I thought it was sooo cute but, of course, I had to change it up a bit.


I used the milk carton Big Shot die (#117310) instead of a box.


I also used different ribbon, I used the cute Scallop Dots Ribbon #124145 and the 1 3/4" circle punch #119850 for the tag.

 
This sweet little container can hold lots of different treats!  I was able to fit about 5 of the little Hershey nuggets into it, yummie, me wuvs chocolate!
 
I also wanted to share a congrats card I got from my upline, Diana Gibbs.  (me wuvs her too)  I couldn't believe I was in the top 10 for sales in the month of August!  
 

I'd like to take a moment to Thank all of my customers that support me and my business, I couldn't have done it without you! Air kisses to you!

 
Cute card layout! Can't wait to play and see what I can come up with using it!
 
Have a fun and safe Weekend!
 
Thanks for stopping by!

Thursday, September 20, 2012

Christmas Cheer

This first card I received from my upline, Diana Gibbs.  So sweet & simple, LOVE it!


Thanks Diana!  :o)

As you might know, it's never too early to start making your Holiday cards!  For this card, I wanted to make my favorite new accessory in the Stampin' Up! Holiday Catalog ~ the Scalloped Tulle Ribbon on page 4, the star of the show.  It's so versatile, easy to work with and beautiful, you'll want all 3 colors available! 

All you have to do is make a bow around your top layer and accessorize!  Just be sure to add dimensionals to that layer to accommodate the ribbon in the back.  This layout can be used for any occasion!


This card is so easy you can create enough, for your whole Holiday Card List, in no time at all!

Stampin' Supply List:
  • Stamp Set:  Sweet Essentials  cling #126457, wood #126455
  • Paper:  Cherry Cobbler  #119685, Very Vanilla #101650
  • Ink:  Cherry Cobbler #126966
  • Accessories:  Big Shot  #113439, Top Note Bigz Die #113463, Vintage Wallpaper Folder #120175, Cherry Cobbler 3 1/2" Scalloped Tulle Ribbon #127841, Brushed Bronze Designer Buttons #127833, Vintage Trinkets  #118764, Dimensionals #104430, Cream Twine
Thanks for stopping by!

Saturday, September 8, 2012

Thank You Sis!

Just a quick post to share the box I sent my sister Samantha and her friend Tennille.  They sent my girls a box full of school supplies (and a couple gifts for me, too :o) and I wanted to Thank them with a box of goodies!

 
Here's the box full of Thank You's and goodies.

 
I sent them each their own bag of Sweet & Korny carmel corn so they wouldn't have to share.

 
I made an initial tag for each of them.  Just glue strips of paper to a piece of paper then I cut out each initial on the Big Shot.  I also cut out each initial in chipboard and glued them together to make the tags more sturdy.  Then, punched a hole, added string and a flower, of course.


Some marshmallow yummies in white chocolate and chocolate (not pictured).


Tennille sent me a stamp set and so I made my Thank You card, to them, with it.  I love it!  Hope they did too.
 
Hope you're having an awesome weekend!  Thanks for stopping by!

Friday, August 24, 2012

Freaky Friday Week #1

Shhhhh...don't tell!  I'm attending my uplines' (Diana Gibbs & Rhonda Morgan's) Fall Fest tomorrow and I thought I'd share my Swaps, Name Tag and gifts (for my friends) today.  I'm just hoping none of them check my blog before then.  tee hee

The theme for the swaps is Fall or Christmas AND since I LOVE LOVE LOVE crafting for Halloween, that's what I did!  Plus, every Friday 'til Halloween, I'm going to post a Halloween themed project!  So, be sure to check back each Friday, if you dare!


Check out my swaps!  Pretty Wicked, eh!?!


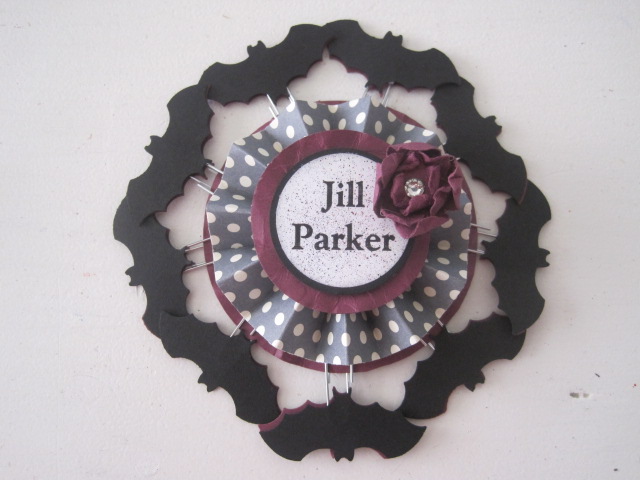
My name tag.  It's interactive, too!  Anyone need a paperclip?  :oP


And, my Top Note Owl, toooo cute, don't ya think!?! 
Of course, I had to include my
Sweet & Korny carmel corn in there somehow. 
I hope they like it!

Thanks for stopping by!

Thursday, August 16, 2012

Monogram Tag 4 Teacher

I LOVE making personalized gifts and the best and easiest way to do that is with either the receivers initial or name.  I used both to make this tag for Shaylin's teacher, Mrs. Elizondo. 

I'm on a roll now, 2 gifts to her teacher in 2 weeks, lets just see how long I can keep it going!  I love to spoil the girls teachers, I just hope they like home made items.  :o)  I was able to get away with it with Keara up until 6th grade.  But, for 7th and now 8th grade, she has more teachers and she gets embarrassed.  So, I just let her know that all she has to do is say the word and I can whip something up for one or all of her teachers.  She has taken me up on it, on a few occasions but not as much as I would like.


This is just a quick tag that would be great for a gift bag, hanging on a hook, anything really!

Soooo simple to make!  I ran a piece of chipboard and background paper scrap thru the Big Shot and the Serif Essentials Alphabet die (retired).  Glued them together.  Then, a Melon Mambo scrap thru the Big Shot and the Floral Fusion Die and made my scrunched flower, with a Rhinestone Jewel, to embellish the *E*.  I also printed out her name on the computer and cut it out.  Added some black twine and ta-da!  Hope she likes it! 

Thanks for stopping by!

Monday, July 16, 2012

Craft Kit Monday

Today's kit is for this beautiful Vintage-y Birthday Card. The kit includes all the supplies needed to make this card, plus a matching envelope! You can purchase this kit for only $4.50 and that includes supplies, detailed instructions and shipping. Any additional kits are only $3.00 each.


To purchase the Vintage-y Birthday Card Kit, please email me at: inkadink4@aol.com and include your name, mailing address and email address. Please let me know how you would like to pay, I accept cash, check or Paypal. If you choose to pay by cash or check, I will give you my mailing address. If you choose to pay by Paypal, I will send you an invoice. Once I receive your payment, I will mail your Kit.


Your Vintage-y Birthday Card Kit will be carefully packed with cardboard to help prevent it from being bent and will include the supplies, shown above, to make this card, with detailed instructions.  The supplies you will need is glue.

When you receive your kit, you will notice that I have stamped on the back of all of the stamped images to comply with Stampin' Up!'s Angel Policy. This stamped image will not affect your completed projects.

Please let me know if you have any questions.

Thanks for stopping by!
Related Posts Plugin for WordPress, Blogger...