Showing posts with label Blossom Punch. Show all posts

Tuesday, October 16, 2012

September Thank You Cards

 Just sharing the *Thank You* cards I sent out to my customers that placed online orders through my website in September.


Want to get a complimentary card from me?  Just place an order though my online store HERE and you will receive your card in the mail at the beginning of the following month.

I also wanted to share another quick and gross treat that anyone would love to make and eat! 

 
Dirty Q-tips!
 
Attach small marshmallows to the end of toothpicks and dip in melted caramel or butterscotch chips.  Yuck and Yum!  Have Fun!
 
Thanks for stopping by!

Tuesday, August 14, 2012

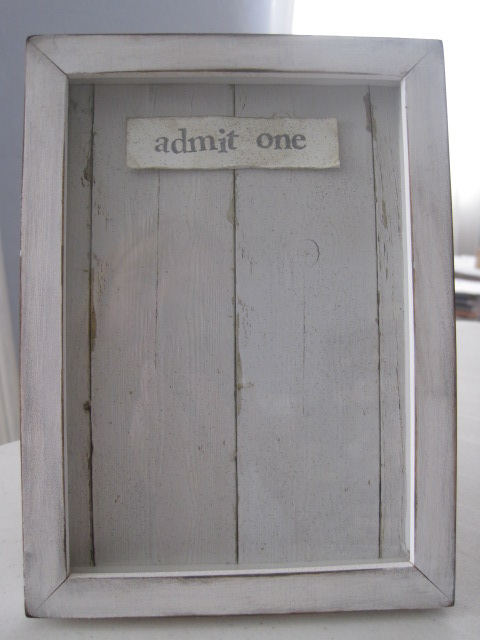
Admit One

My girls and I get to the movies every so often and I always try to keep the ticket stubs.  Do any of you do that?  Is that weird?  Anyway, I found this cute idea on Pinterest HERE but when I went to the site, there weren't any directions.  I LOVE figuring out how something is made and putting my own twist on it.  So, this was a fun challenge for me!

I always try to have frames on hand because they are so versatile and you never know when you're going to need one.  I have found some great ones at the Dollar Store over the years.  And, I just happened to have a 5" x 7" shadowbox from there.  I thought it would be perfect for my movie tickets.


This is my completed project.  I LOVE IT!  Now my wallet is void of all those random movie tickets and they are out where we can see them and reminisce on our movie adventures.


This is how it looked before I started.


I sanded all of the edges of the frame.


Then, I added Basic Grey and Soft Suede Stampin' Up! ink in layers with a sponge and also, directly swiped the ink pad on the frame in places.


I attached the background paper (retired Stampin' Up! background paper) to the inside of the back piece of the frame with glue dots.  Then, I made my *admit one* tag and used my Crop-a-dile, punching overlapping holes, to make a slit along the top.  I had to make sure it was wide enough for me to slip the tickets through.


Ignore the upside down *admit one*.  I boo boo'd and flipped it over and stamped the one I used on the other side.  I just wanted to show you how I attached the pieces of Dimensionals.  I attached it to the background paper so that the dimensionals would sit above the slit.  Does double duty, covers the unsightly opening and gives it a little dimension.


Here it is all distressed and almost done. 


Of course, I had to add a scrunched flower and don't forget the ticket stubs!

Thanks for stopping by!

Sunday, June 24, 2012

Date Night!


My husband got tickets for *Kooza* Cirque du Soleil for us for my birthday.  I hesitated because of the price of the tickets but I have ALWAYS wanted to see one of their shows so I went with it.  I'm so glad I did!  It was AWESOME!  It's so hard to put into words but it touched so many emotions and it was soooo entertaining!  If you ever get the chance to go, do it! 

Here we are, getting ready to leave for the show.  Keep in mind, we are goofy and don't get out or get our pics taken very often.


After we found our seats, there wasn't a bad seat there, I asked my husband if the tickets said anything about cameras.  He checked and said no.  So, I pulled out my camera and snapped this pic before the show started.  Then, security quickly came over and asked me not to take anymore.  Ooops!


Here's an adorable box made using the new Polka Dot Designer Series Paper.  I found the idea on Dawn Griffith's blog.  Be sure to check out her blog, she is very creative!  If you'd like to view her video for this box, go HERE 


Thanks for stopping by!

Wednesday, April 18, 2012

Envie Basket

I had my *Envie Class* last night and it was so much fun!  There are so many beautiful things you can create with a simple envelope, who knew!?!  Over the next few days, I will share some of the different projects we made.

Today, I am sharing the *Envie Basket*.  We made this project with Stampin' Up!'s Crumb Cake envelope #107297.  The feel/look of this was inspired by a card made by Becky @ Inking Idaho.  You can view her card here:  http://inkingidaho.blogspot.com/2012/04/crumb-cake-embossingsounds-yummy.html


Wondering how to make this?  Here we go!

  
You will seal the envelope closed then punch either side with the Large Tag Punch #119876.


Then, you will cut up, on both sides, following the punched part to create the *handle*.  You will notice I crimped the *handle* with the Crimper #101618 and the *basket* was run through the Big Shot #113439 with the Vintage Wallpaper Folder #120175.  From there you can decorate it any way you'd like!  You can also use any size envelope you want.

Here's how to make the flower.  Not sure if it's the same way Becky made hers but this is what I did.


I punched  2 ~ 1 3/4" Scallop Punch #119854 (I stacked them & cut @ each indent almost to the center to make *petals*) and 1 Blossom Punch #125603 in Pool Party cardstock.  The leaves are from the Blossom Punch also in Lucky Limeade.  The center of the flower is from the Mixed Bunch stamp set w #125535 c #125537 with a Basic Rhinestone #119246 in the center.


Then, you will scrunch up all of the pieces except for the center.


Open them up and glue together with Multipurpose Liquid Glue #110755. 

I placed an Oatmeal Pie inside the basket because that's what I had on hand but you can fill it with whatever you want.  Have Fun!

Thanks for stopping by!  Enjoy!

Wednesday, March 28, 2012

Wanna Play?


Last night was my Technique Tuesday class and we learned the *Tap Dancing* technique.  But, before I get to the projects we made, I wanted to share another fun part of this class.  It's called *WWYD* ~ What Would You Do?  Everyone gets an envelope of the same supplies to take home with them.  Then, at the next Technique Tuesday class, everyone brings the card they made with the supplies.  It is so fun to see what everyone created and no 2 cards are ever the same. 

SOOO, I thought I would see if you wanted to join in the fun, too?!  Here are the supplies that everyone got at class last night.  Just copy the supplies below and see what you can create.  Feel free to share what you made by emailing me a pic and I will post it here after my next Technique Tuesday Class, along with what everyone at class created.  Wanna play?

(If you'd like to check out our WWYD cards from last night, go to my meetup site:  www.meetup.com/inkie-pinkies)


WWYD Supplies:  8 1/2" x 5 1/2" Tempting Turquoise cardstock, 4 1/4" x 2" Brights Collection Paper Stack, 1 1/2" x 5 1/2" Whisper White cardstock, 2 Whisper White Blossom Punch, 1 1/4" Pumpkin Pie circle punch, 1" Whisper White Circle Punch stamped with Pumpkin Pie Mixed Bunch stamp.

This is the 1st time trying this on my blog so if you have any suggestions or questions, they are always welcome!

Ok, on to the *Tap Dancing* technique we learned last night.  I found this technique in the Stampin' Success for April.  As a Stampin' Up! Demonstrator, we receive this magazine monthly.  It's a great source for ideas and motivation.  Feel free to contact me if you'd like to know more!


This is the card we made in class.


This is the note card/envelope we made using the Scallop Envelope Bigz Die.

Tap Dancing How To:  Choose a stamp and a lighter color ink pad and a darker color marker.  You can use more than 2 colors but I just used 2 on each project.  You will ink up your stamp with the lighter ink pad then randomly color over the inked stamp with a darker color marker.  Just try it once and you will see how easy it is.  And, each time you do it, it will never come out the same twice.

 Have fun with this technique!  Contact me if you'd like a list of supplies.

Thanks for stopping by!

Sunday, March 25, 2012

Sale-a-bration Time is almost over!

Just a quick reminder that there is only 1 week left to earn FREE Sale-a-bration items! All you need to do is place a $50 Stampin' Up! order (before shipping and tax) and you will qualify!  You can view the Sale-a-bration catalog on my Stampin' Up! website under *Products*.
 
If you place an online order thru my website (www.jillparker.stampinup.net), this week, I will send you a kit for one of my *Easel Boxes*, as a *Thank You*!   Don't miss out on your opportunity to receive one of these cuties!


Remember, you only have until March 31st to place your Sale-a-bration order!


Keara and Shaylin went to a Birthday Slumber Party last night so I had the night to myself. Did I watch a movie, get in the hot tub, craft, etc...? I was asleep by 9:30pm, how sad is that?!  Maybe I'll get some stuff done today.  :o)
 
Here is the tag I made for the gift bag.  I punched the 2 1/2" circle in black and white and glued them together so the girls could sign their birthday wishes on the white side.
 
Stampin' Supplies List:
  • Stamps:  Mixed Bunch  wood #125535  clear #125537
  • Ink:  Melon Mambo #115656
  • Paper:  Whisper White #100730, Basic Black #121045,
  • Accessories:  Blossom Punch #125603, 2 1/2" Circle Punch #120906, 1/2" Circle Punch #119869, Crimper #101618, Glitter Chipboard letter, black bakers twine
Have a Wonderful Day!

Thursday, March 22, 2012

Vintage Mixed Bunch Card

Added 7/2/12:  Would you like a kit for this card?  Click HERE for details.

Just wanted to share another project we will be making in tonight's *Mixed Bunch* class.  Love, love, love these soft colors together!  How 'bout you?


Want to make one?  Contact me to find out how!

Stampin' Supplies List:
  • Stamp: Mixed Bunch wood #125535 clear #125537, You're My Type  wood #125564  clear #125650
  • Ink:  Baja Breeze #111833, Crumb Cake #121030
  • Paper:  Very Vanilla #101650
  • Accessories: Blossom Punch #125603, Lace Ribbon Border Punch #122362, 3/4" Circle Punch #119873, Jewelry Tag Punch #117190, Very Vanilla Seam Binding Ribbon #120999, Linen Thread #104199, Basic Pearl Jewels #119247, Large Pearl Basic Jewels #125577, Dimensionals #104430

Thanks for stopping by!


Wednesday, March 21, 2012

Simply Wonderful!

Hi!  I'm a box full of Sweet & Korny Carmel Corn and I'm all packed up and ready for my trip to Fort Bragg, CA!  Yippee!  I can't wait to get there! 


If you'd like a box full of *Melt in your mouth* Carmel Corn shipped to you or someone special, email me or make a comment and I'll contact you ASAP so I can get your order made and on it's way.  If you'd like more info (sizes & prices) check out my Sweet & Korny post or I can let you know when I contact you. 


This cute * Blossom Easel Box* is one of the projects we will be making in my *Mixed Bunch Class* tomorrow night!  I was inspired by Diana Gibbs easel box, which you can view here:  http://dianagibbs.typepad.com/stampin_with_di/2010/03/easter-easel-box-tutorial.html

There are quite a few steps but the result is worth it!  It is simply wonderful!

Stampin' Supplies List:
  • Stamp:  Mixed Bunch  wood #125535  clear #125537, Friendly Phrases  wood #126149  clear #126151
  • Ink:  Old Olive #102277
  • Paper:  Daffodil Delight #119683, Whisper White #100730, Brights Designer Series Stack #117155
  • Accessories: Blossom Punch #125603, 5-Petal Flower Punch #119880, 3/4" Circle Punch  #119873, Crimper #101618, Subtles Brads #119740, Paper Piercing Tool #116631, Mat Pack #105826, Dimensionals #104430
Thanks for stopping by!  I'm off to bed, Goodnight!

Related Posts Plugin for WordPress, Blogger...