Showing posts with label Decorative Label Punch. Show all posts

Saturday, September 1, 2012

Spooky Saturday (Freaky Friday Week #2)

I boo boo'd and forgot to post my *Freaky Friday* projects soooooo you're getting a *Spooky Saturday* instead! 

This project is so cute and simple!  You can make tons in no time!  They would be great for place settings, party decorations, gifts, etc... really anything!


All 3 Halloween characters are made with the *Owl Builder* Punch
(and a couple others). 
They are soooo easy to make!


Check out the kitty's *Googlies*! 
You can add these to any creature and it makes them just that much cuter!


To make the Hershey Nugget treat holders, you will punch 2 pieces
from the Petal Card Double Punch.


Fold in 3 of the petals on both punched pieces and apply strong glue or sticky strip to the 3 folded petals on only one of them.


I attach the bottom pieces together first.


 Then, I bring the 2 punches towards each other and attach the sides together.  It makes it a little easier if you have the bottom sitting on the table so that it is even and your finished product isn't tilted to one side.


The Hershey Chocolate Nuggets fit perfectly into this little treat holder. 
You can decorate an address label and wrap it around the nugget.

 
Then, decorate any way you'd like!
 
I heat embossed a stamp from *Toxic Treats* with white embossing powder on Basic Grey card stock and punched it out with the matching Decorative Label punch.  I attached it to the treat holder with sticky strip then attached my cute creatures with dimensionals.
 
VERY quick!  VERY easy!  VERY cute!
 

Stampin' Supply List:
  • Stamp Set:  Toxic Treats clear #127901, wood #127898
  • Paper:  Basic Grey  #121044, Basic Black #121045, Whisper White #100730, Rich Razzleberry #115316, Pumpkin Pie #105117
  • Ink:  Basic Black Ink Pad #126980, VersaMark #102283, uni-ball Signo Gel Pen #105021
  • Accessories:  Owl Builder Punch  #118074, Petal Card Double Punch #119273, Decorative Label Punch #120907, Scallop Edge Border Punch (bottom of Ghost) #119882, Rhinestone Basic Jewels #119246, Googlies #127539, Dimensionals #104430
Thanks for stopping by! 
Have a SAFE Holiday Weekend!

Friday, August 24, 2012

Freaky Friday Week #1

Shhhhh...don't tell!  I'm attending my uplines' (Diana Gibbs & Rhonda Morgan's) Fall Fest tomorrow and I thought I'd share my Swaps, Name Tag and gifts (for my friends) today.  I'm just hoping none of them check my blog before then.  tee hee

The theme for the swaps is Fall or Christmas AND since I LOVE LOVE LOVE crafting for Halloween, that's what I did!  Plus, every Friday 'til Halloween, I'm going to post a Halloween themed project!  So, be sure to check back each Friday, if you dare!


Check out my swaps!  Pretty Wicked, eh!?!


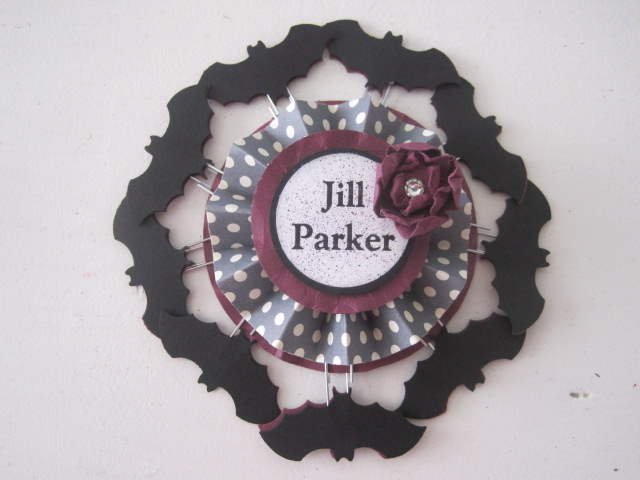
My name tag.  It's interactive, too!  Anyone need a paperclip?  :oP


And, my Top Note Owl, toooo cute, don't ya think!?! 
Of course, I had to include my
Sweet & Korny carmel corn in there somehow. 
I hope they like it!

Thanks for stopping by!

Wednesday, March 28, 2012

Wanna Play?


Last night was my Technique Tuesday class and we learned the *Tap Dancing* technique.  But, before I get to the projects we made, I wanted to share another fun part of this class.  It's called *WWYD* ~ What Would You Do?  Everyone gets an envelope of the same supplies to take home with them.  Then, at the next Technique Tuesday class, everyone brings the card they made with the supplies.  It is so fun to see what everyone created and no 2 cards are ever the same. 

SOOO, I thought I would see if you wanted to join in the fun, too?!  Here are the supplies that everyone got at class last night.  Just copy the supplies below and see what you can create.  Feel free to share what you made by emailing me a pic and I will post it here after my next Technique Tuesday Class, along with what everyone at class created.  Wanna play?

(If you'd like to check out our WWYD cards from last night, go to my meetup site:  www.meetup.com/inkie-pinkies)


WWYD Supplies:  8 1/2" x 5 1/2" Tempting Turquoise cardstock, 4 1/4" x 2" Brights Collection Paper Stack, 1 1/2" x 5 1/2" Whisper White cardstock, 2 Whisper White Blossom Punch, 1 1/4" Pumpkin Pie circle punch, 1" Whisper White Circle Punch stamped with Pumpkin Pie Mixed Bunch stamp.

This is the 1st time trying this on my blog so if you have any suggestions or questions, they are always welcome!

Ok, on to the *Tap Dancing* technique we learned last night.  I found this technique in the Stampin' Success for April.  As a Stampin' Up! Demonstrator, we receive this magazine monthly.  It's a great source for ideas and motivation.  Feel free to contact me if you'd like to know more!


This is the card we made in class.


This is the note card/envelope we made using the Scallop Envelope Bigz Die.

Tap Dancing How To:  Choose a stamp and a lighter color ink pad and a darker color marker.  You can use more than 2 colors but I just used 2 on each project.  You will ink up your stamp with the lighter ink pad then randomly color over the inked stamp with a darker color marker.  Just try it once and you will see how easy it is.  And, each time you do it, it will never come out the same twice.

 Have fun with this technique!  Contact me if you'd like a list of supplies.

Thanks for stopping by!

Wednesday, March 14, 2012

More Flowers, please!

Yes, I will admit it, I love making scrunched flowers!  Anyone that attends my classes can tell you that's true!  They are just so pretty and easy to make, how can you resist? 


Today's projects feature the *Floral Fusion* scrunched flowers and I have included a quick *how to*.  The box is from the *Petal Cone Die* Class, which inspired me to make the card, too.


Here are the directions for making the *Floral Fusion* scrunched flower (which are made just like the *Scalloped* scrunched flower).  Spritz each of the pieces of the flower and scrunch them up into little balls.  Let them dry a little bit then open them up and shape them.  Let them dry completely, then glue each piece inside the other.  Attach a rhinestone and a leaf section from the *Bird Builder* punch and wha-la, you have a beautiful flower. 


Stampin' Supplies List:
  •  Stamp:  A Word for You  wood #117032  clear #120528
  •  Ink:  Old Olive ink pad #102277 and marker #100079
  •  Paper:  Certainly Celery #105125, Melon Mambo #115320, Whisper White #100730, Old Olive #100702
  •  Accessories:  Big Shot Die Machine #113439, Floral Fusion Sizzlits Die #115969, Backgrounds 1 Textures Plates #114512, Decorative Label Punch #120907, Bird Builder Punch #117191, Basic Rhinestone Jewels #119246, Lucky Limeade Bakers Twine #125572, 5/8" Whisper White Satin Ribbon #114616, Dimensionals #104430 
Enjoy and Thanks for visiting!

PS:  If you purchase the *Floral Fusion* Sizzlits Die and/or the *A Word for You* stamp set today, March 14, 2012, from my Stampin' Up! online store, I will send you a Complimentary kit to make this card.

PSS:  I just posted this card to Splitcoast Stampers, yikes!  It was my first time posting anything there and it wasn't as hard as I thought it would be.  I should have tried it sooner!  I'm such a scaredy cat!
Related Posts Plugin for WordPress, Blogger...