Showing posts with label Vintage Wallpaper Folder. Show all posts

Thursday, October 25, 2012

Aluminum Foil Technique

As I was looking for a technique for my Technique Tuesday class, I saw many cards made with metal.  I loved the look but didn't have any metal sheets but I did have heavy duty aluminum foil which I thought would make a great substitute!  Of course it isn't as stiff as metal so you'll need to be careful with it but the look is right on!


For this card, I ran a piece of heavy duty aluminum foil through the Big Shot with the "Top Note" Die then ran it through again in the Vintage Wallpaper folder.  Then, with a sponge, I swirled Basic Black ink over the foil.  The more ink, the darker which gives it a great worn or patina look.  Then, I added a flower I made with the Rich Razzleberry paper, bow from the Basic Black Taffeta Ribbon and a sentiment from the Sweet Essentials stamp set.


This one was even easier!  I distressed the edges of Baja Breeze and Whisper White card stock and layered them.  Then, I cut a snowflake from the Snowflake #2 Sizzix die (retired).  Then, tied some twine and made a bow so that when you are putting it in an envelope, it runs along the twine and not the foil.  I added a sentiment from the Teeny Tiny Wishes stamp set.  This set has a sentiment for practically every occasion you can think of!

(Forgot to mention that I just glued the foil to the card stock on both cards with the Tombow Multipurpose Liquid Glue, LOVE IT!!!)

Have fun with this technique!  Would love to see what you come up with!

Thanks for stopping by!

Thursday, September 20, 2012

Christmas Cheer

This first card I received from my upline, Diana Gibbs.  So sweet & simple, LOVE it!


Thanks Diana!  :o)

As you might know, it's never too early to start making your Holiday cards!  For this card, I wanted to make my favorite new accessory in the Stampin' Up! Holiday Catalog ~ the Scalloped Tulle Ribbon on page 4, the star of the show.  It's so versatile, easy to work with and beautiful, you'll want all 3 colors available! 

All you have to do is make a bow around your top layer and accessorize!  Just be sure to add dimensionals to that layer to accommodate the ribbon in the back.  This layout can be used for any occasion!


This card is so easy you can create enough, for your whole Holiday Card List, in no time at all!

Stampin' Supply List:
  • Stamp Set:  Sweet Essentials  cling #126457, wood #126455
  • Paper:  Cherry Cobbler  #119685, Very Vanilla #101650
  • Ink:  Cherry Cobbler #126966
  • Accessories:  Big Shot  #113439, Top Note Bigz Die #113463, Vintage Wallpaper Folder #120175, Cherry Cobbler 3 1/2" Scalloped Tulle Ribbon #127841, Brushed Bronze Designer Buttons #127833, Vintage Trinkets  #118764, Dimensionals #104430, Cream Twine
Thanks for stopping by!

Friday, August 24, 2012

Freaky Friday Week #1

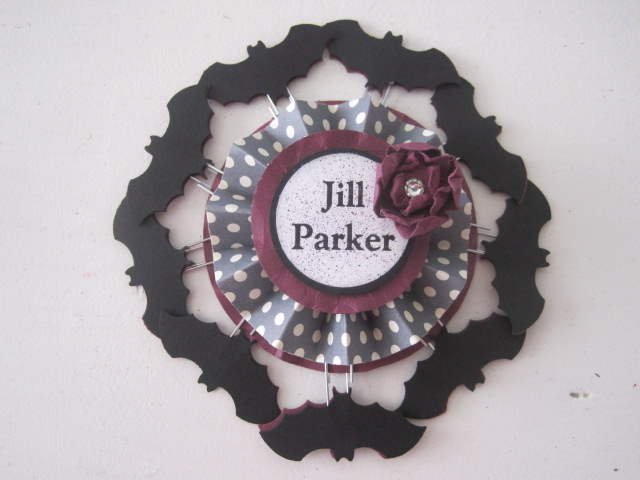
Shhhhh...don't tell!  I'm attending my uplines' (Diana Gibbs & Rhonda Morgan's) Fall Fest tomorrow and I thought I'd share my Swaps, Name Tag and gifts (for my friends) today.  I'm just hoping none of them check my blog before then.  tee hee

The theme for the swaps is Fall or Christmas AND since I LOVE LOVE LOVE crafting for Halloween, that's what I did!  Plus, every Friday 'til Halloween, I'm going to post a Halloween themed project!  So, be sure to check back each Friday, if you dare!


Check out my swaps!  Pretty Wicked, eh!?!


My name tag.  It's interactive, too!  Anyone need a paperclip?  :oP


And, my Top Note Owl, toooo cute, don't ya think!?! 
Of course, I had to include my
Sweet & Korny carmel corn in there somehow. 
I hope they like it!

Thanks for stopping by!

Monday, July 16, 2012

Craft Kit Monday

Today's kit is for this beautiful Vintage-y Birthday Card. The kit includes all the supplies needed to make this card, plus a matching envelope! You can purchase this kit for only $4.50 and that includes supplies, detailed instructions and shipping. Any additional kits are only $3.00 each.


To purchase the Vintage-y Birthday Card Kit, please email me at: inkadink4@aol.com and include your name, mailing address and email address. Please let me know how you would like to pay, I accept cash, check or Paypal. If you choose to pay by cash or check, I will give you my mailing address. If you choose to pay by Paypal, I will send you an invoice. Once I receive your payment, I will mail your Kit.


Your Vintage-y Birthday Card Kit will be carefully packed with cardboard to help prevent it from being bent and will include the supplies, shown above, to make this card, with detailed instructions.  The supplies you will need is glue.

When you receive your kit, you will notice that I have stamped on the back of all of the stamped images to comply with Stampin' Up!'s Angel Policy. This stamped image will not affect your completed projects.

Please let me know if you have any questions.

Thanks for stopping by!

Friday, June 22, 2012

1st Place!

Today Shaylin competed in her 2nd Dive Meet of the Summer and earned 1st Place for her age group! 


She got 7th at the first dive meet last week and she was disappointed when she received a participant ribbon. 


I explained to her that she needs to do the harder dives she's been learning so she can earn a higher score.  I think that was a lightbulb moment for her because that's exactly what she did!  She was so excited and we were soooo happy for her! 


I really don't know how she does some of these dives!  I'm scared to even jump into the pool from the side now that I'm older and I know things can break!  Ok, I'm not ashamed to admit I'm a sissy!  :o)


Well, it's been a long day for us so I will quickly share another card made with the Papaya Collage stamp set.  It's a simple 3" x 3" card and you can never have too many of these babies!  So, quick and easy and nice to have when you need to slip a little note or birthday wish to someone!


Thanks for stopping by!  Have a fun and safe weekend!

Wednesday, April 18, 2012

Envie Basket

I had my *Envie Class* last night and it was so much fun!  There are so many beautiful things you can create with a simple envelope, who knew!?!  Over the next few days, I will share some of the different projects we made.

Today, I am sharing the *Envie Basket*.  We made this project with Stampin' Up!'s Crumb Cake envelope #107297.  The feel/look of this was inspired by a card made by Becky @ Inking Idaho.  You can view her card here:  http://inkingidaho.blogspot.com/2012/04/crumb-cake-embossingsounds-yummy.html


Wondering how to make this?  Here we go!

  
You will seal the envelope closed then punch either side with the Large Tag Punch #119876.


Then, you will cut up, on both sides, following the punched part to create the *handle*.  You will notice I crimped the *handle* with the Crimper #101618 and the *basket* was run through the Big Shot #113439 with the Vintage Wallpaper Folder #120175.  From there you can decorate it any way you'd like!  You can also use any size envelope you want.

Here's how to make the flower.  Not sure if it's the same way Becky made hers but this is what I did.


I punched  2 ~ 1 3/4" Scallop Punch #119854 (I stacked them & cut @ each indent almost to the center to make *petals*) and 1 Blossom Punch #125603 in Pool Party cardstock.  The leaves are from the Blossom Punch also in Lucky Limeade.  The center of the flower is from the Mixed Bunch stamp set w #125535 c #125537 with a Basic Rhinestone #119246 in the center.


Then, you will scrunch up all of the pieces except for the center.


Open them up and glue together with Multipurpose Liquid Glue #110755. 

I placed an Oatmeal Pie inside the basket because that's what I had on hand but you can fill it with whatever you want.  Have Fun!

Thanks for stopping by!  Enjoy!

Related Posts Plugin for WordPress, Blogger...